


In this section, we demonstrate how to retrieve Dataverse records using a Power Apps code app. This implementation follows the official guidance but uses custom application code to fetch and render Contact data in a React-based environment.
Missed Part 1? Read our guide on creating a Power Apps Code App from scratch here.
This approach gives developers fine-grained control over query options, error handling, and UI rendering while still leveraging Power Platform–generated services.
The goal of this example is to:
Retrieve the latest 10 Contact records from Dataverse.
Select only required fields for performance optimization.
Display the data in a clean, user-friendly UI.
Handle loading and error states gracefully.
Adding Dataverse as a Data Source to the Code App
Before a Power Apps code app can interact with Microsoft Dataverse, it must be explicitly registered as a data source. This is done using the Power Platform CLI.
This step is mandatory because it enables:
Service generation for Dataverse tables.
Strongly typed APIs (such as ContactsService).
Secure, environment-aware data access.
1. Register the Contact Table
From the root of your code app project, run the following command to register the table. This generates the strongly typed services under /generated/services/ContactsService.
					<pre style="background: #f4f4f4; padding: 15px; border-radius: 5px; font-family: monospace;">
pac code add-data-source -a dataverse -t contact
</pre>
Using the Generated Contacts Service
When a code app is initialized and Dataverse services are generated, Power Apps creates strongly typed service classes. In this example, the app uses a generated ContactsService to retrieve Dataverse records instead of manually calling the Web API.
Note: Without the registration step above, ContactsService will not exist, and your app will fail at compile time.
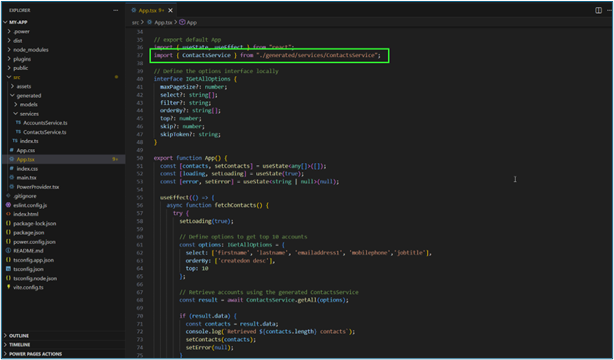
2. Import the Service
					<pre style="background: #f4f4f4; padding: 15px; border-radius: 5px; font-family: monospace;">
import { ContactsService } from "./generated/services/ContactsService";
</pre>

Defining Query Options and Retrieving Data
To retrieve Dataverse records efficiently, query options are defined using a local interface that mirrors Dataverse query capabilities such as $select, $orderby, and $top.
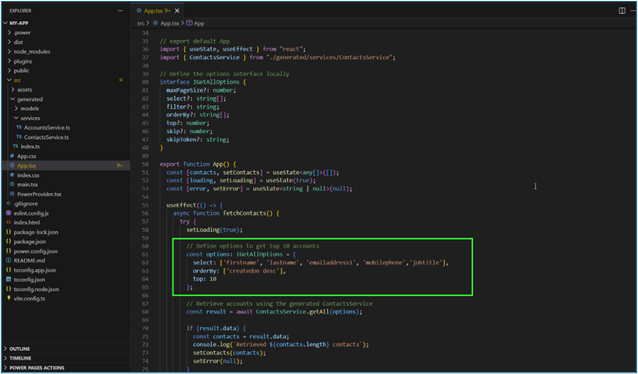
3. Define Query Options
					<pre style="background: #f4f4f4; padding: 15px; border-radius: 5px; font-family: monospace;">
const options = {
  select: ['firstname', 'lastname', 'emailaddress1', 'mobilephone', 'jobtitle'],
  orderBy: ['createdon desc'],
  top: 10
};
</pre>
Key considerations:
Select only required columns to reduce payload size.
Order records by createdon to get the most recent contacts.
Limit results using top to improve performance.
4. Call the getAll Method
The actual data retrieval is performed using the getAll method provided by the generated service:
					<pre style="background: #f4f4f4; padding: 15px; border-radius: 5px; font-family: monospace;">
const result = await ContactsService.getAll(options);
</pre>
The complete implementation for this example is available in our Git repository. Refer to App.tsx for the Dataverse data retrieval logic and App.css for the UI styling. Additional files can be referenced if deeper implementation details are required.
If data is returned successfully, the records are stored in React state and rendered in the UI. Any exceptions are captured and displayed to the user.
Rendering Contacts in the UI
Once retrieved, the Contact records are displayed in a structured layout showing:
- Full name
- Job title
- Phone number
- Email address
This demonstrates how Dataverse data can be seamlessly bound to UI components in a code-first Power Apps experience.
Need Enterprise Data Integration?
Connecting complex Dataverse structures to custom apps can be challenging.
Let our architects handle your data modeling and security.
FAQs
How do I add Dataverse as a data source in a code app?
You must use the Power Platform CLI command: pac code add-data-source -a dataverse -t <table-name>. This registers the table and generates the necessary TypeScript service files for strongly typed access.
What is the benefit of using the generated ContactsService?
The generated service abstracts away complex tasks like authentication, endpoint management, and response parsing. It allows you to retrieve Dataverse records using simple method calls (like getAll) rather than manually constructing Web API HTTP requests.
Can I filter the records retrieved from Dataverse?
Yes. The service accepts an options object where you can define standard OData query parameters, including select (to limit columns), orderBy (to sort data), filter (for specific criteria), and top (to limit the number of records).
Why should I select only specific columns?
Selecting only the columns you need (using the select array) significantly reduces the payload size sent over the network. This improves the performance and load time of your Power Apps code app, especially on mobile devices.