


Microsoft Dynamics 365 Business Central is the backbone of financial operations for thousands of small and mid-sized businesses – managing sales, purchasing, inventory, and finance in one place. But when customer orders arrive through a web form, an e-commerce platform, or a third-party CRM, manually re-entering them into Business Central is slow and error-prone.
Power Automate solves this. Using Business Central’s built-in REST API and Power Automate’s HTTP connector, you can automatically create sales orders in Business Central the moment a trigger fires – whether that’s a new Dataverse record, a SharePoint item, a webhook from your website, or even an email.
In this guide, you will learn how to call the Business Central API from Power Automate to create sales order headers and lines – no custom code or third-party connectors required. This integration is a typical engagement under Alphavima’s Microsoft Business Central ERP consulting practice.
Why Use the Business Central API vs the Native Connector?
Power Automate includes a native Microsoft Dynamics 365 Business Central connector with pre-built actions like “Create record” and “Get record”. This connector works well for simple scenarios. However, the HTTP API approach gives you:
- Access to all BC API endpoints, not just those exposed in the connector
- The ability to create complex nested records (e.g., sales order header + lines in one operation)
- Full control over request headers, authentication, and error handling
- Support for custom BC APIs (AL-developed extensions)
For simpler use cases, the native connector is faster to implement. For production integrations with multi-line orders, we recommend the API approach covered here.
Prerequisites
Power Automate includes a native Microsoft Dynamics 365 Business Central connector with pre-built actions like “Create record” and “Get record”. This connector works well for simple scenarios. However, the HTTP API approach gives you:
- Access to all BC API endpoints, not just those exposed in the connector
- The ability to create complex nested records (e.g., sales order header + lines in one operation)
- Full control over request headers, authentication, and error handling
- Support for custom BC APIs (AL-developed extensions)
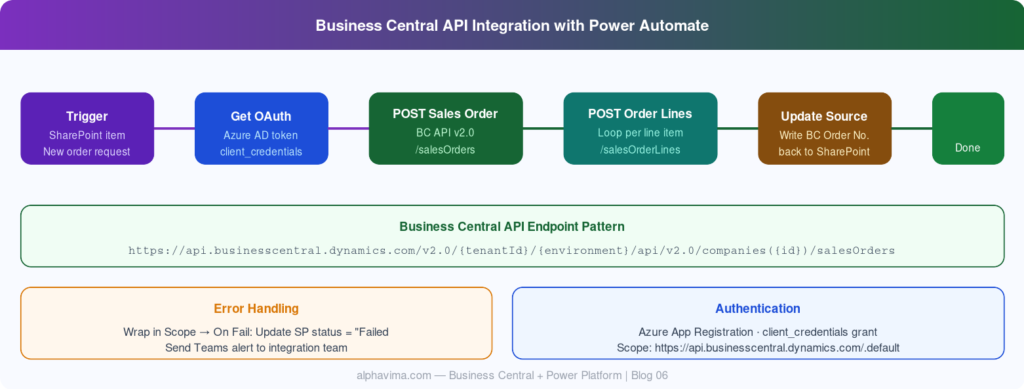
Integration Architecture
The integration works as follows:
- Trigger: Power Automate receives a new order signal (e.g., SharePoint item, webhook, Dataverse record)
- Authenticate: Power Automate gets an OAuth 2.0 token from Azure AD
- API Call: Power Automate sends a POST request to the Business Central Sales Orders API
- BC processes the order and returns the new order number
- Power Automate stores the BC order number back in the source system for reference
Step 1: Register an Azure App for BC Authentication
Business Central’s API uses OAuth 2.0. You need an Azure App Registration to authenticate Power Automate.
- Go to the Azure Portal → Azure Active Directory → App registrations → New registration.
- Fill in:
- Name: PowerAutomate-BC-Integration
- Supported account types: Single tenant
- Click Register.
- Note the Application (client) ID and Directory (tenant) ID – you’ll need these later.
Add API permissions:
- In your app registration, go to API permissions → Add a permission.
- Select Dynamics 365 Business Central → Delegated permissions.
- Check ReadWrite.All.
- Click Add permissions → Grant admin consent.
Create a client secret:
- Go to Certificates & secrets → New client secret.
- Set expiry to 24 months.
- Copy the secret value immediately – it won’t be shown again.
Security note: Store the client secret in Azure Key Vault for production use. Never hard-code secrets in Power Automate flow actions.
Step 2: Find Your Business Central API Endpoint
The Business Central API endpoint follows this pattern:
https://api.businesscentral.dynamics.com/v2.0/{tenantId}/{environmentName}/api/v2.0/companies({companyId})/salesOrders
To find your companyId:
- In Business Central, go to Settings → Company Information.
- Or call the companies endpoint: GET https://api.businesscentral.dynamics.com/v2.0/{tenantId}/{environmentName}/api/v2.0/companies
The API returns a list of companies with their IDs. Note the id field for your company.
The full documentation for the Business Central API v2.0 is available at Microsoft Docs – BC API Reference.
Step 3: Build the Power Automate Flow
Create the Flow
- Go to powerautomate.com.
- Click Create → Automated cloud flow.
- Name it: “Create BC Sales Order from New Request”
- Trigger: “When an item is created” (SharePoint) – or your preferred trigger.
- Click Create.
Step 4: Get the OAuth Token
Before calling the BC API, you need a bearer token.
- Add step: “HTTP” action (Premium connector).
- Configure as follows:
| Field | Value |
| Method | POST |
| URI | https://login.microsoftonline.com/{tenantId}/oauth2/v2.0/token |
| Headers | Content-Type: application/x-www-form-urlencoded |
| Body | grant_type=client_credentials&client_id={appId}&client_secret={appSecret}&scope=https://api.businesscentral.dynamics.com/.default |
Replace {tenantId}, {appId}, and {appSecret} with your actual values.
- Add a Parse JSON action after the HTTP step to extract the token:
- Content: Body of HTTP response
- Schema: Generate from sample using {“access_token”: “xxx”, “token_type”: “Bearer”, “expires_in”: 3600}
Step 5: Create the Sales Order Header
- Add another HTTP
- Configure:
Field | Value |
Method | POST |
URI | https://api.businesscentral.dynamics.com/v2.0/{tenantId}/{environmentName}/api/v2.0/companies({companyId})/salesOrders |
Headers | Authorization: Bearer @{body(‘Parse_JSON’)?[‘access_token’]} Content-Type: application/json |
Body (JSON):
					{
  "customerNumber": "@{triggerOutputs()?['body/CustomerNumber']}",
  "orderDate": "@{formatDateTime(utcNow(), 'yyyy-MM-dd')}",
  "shipToName": "@{triggerOutputs()?['body/ShipToName']}",
  "shipToAddressLine1": "@{triggerOutputs()?['body/ShipToAddress']}",
  "shipToCity": "@{triggerOutputs()?['body/ShipToCity']}",
  "shipToPostCode": "@{triggerOutputs()?['body/PostCode']}",
  "externalDocumentNumber": "@{triggerOutputs()?['body/ID']}"
}
Parse the response to extract the new sales order id and number.
Tip: Use externalDocumentNumber to store the source system reference (e.g., SharePoint item ID) – this makes reconciliation much easier later.
Step 6: Add Sales Order Lines
With the sales order created, add line items using the salesOrderLines sub-resource.
- Add Apply to each action (if processing multiple line items from a JSON array).
- Inside the loop, add another HTTP action:
Field | Value |
Method | POST |
URI | https://api.businesscentral.dynamics.com/v2.0/{tenantId}/{environmentName}/api/v2.0/companies({companyId})/salesOrders({salesOrderId})/salesOrderLines |
Replace {salesOrderId} with the id returned from the Step 5 response.
Body:
					{
  "itemId": "@{items('Apply_to_each')?['itemId']}",
  "quantity": @{items('Apply_to_each')?['quantity']},
  "unitPrice": @{items('Apply_to_each')?['unitPrice']},
  "description": "@{items('Apply_to_each')?['description']}"
}
Step 7: Store the BC Order Number Back in Source
- Add “Update item” (SharePoint) action.
- Set the BC Order Number column to the sales order number from the Step 5 response.
- Set Integration Status to Synced.
This creates a two-way reference – the SharePoint item knows its BC order number, and BC has the SharePoint item ID as the external document number.
Error Handling
- Wrap your HTTP actions in a Scope.
- After the scope, add a Condition checking if the scope succeeded.
- If failed:
- Update SharePoint item Integration Status to Failed
- Send an email or Teams notification to the integration team
- Log the error details (HTTP response body) to a SharePoint errors list
For monitoring flow health over time, refer to our Power Automate flow version history guide.
Best Practices
- Use client credentials (app registration) rather than delegated permissions for unattended flows – this avoids token expiry tied to a specific user’s session
- Cache the OAuth token – tokens are valid for 1 hour; avoid calling the token endpoint on every flow run if you process high volumes (use variables and check expires_in)
- Validate customer numbers before calling BC – a failed order creation due to a missing customer is better caught early in the flow
- Test with BC sandbox environments before deploying to production
- Set up alerting for flows processing financial transactions – a silent failure in order creation is a serious business issue
Conclusion
Business Central’s API, combined with Power Automate’s HTTP connector, gives you a direct, reliable channel for automating order creation from any source – web forms, CRM systems, e-commerce platforms, or manual triggers. Once this integration is live, your team can stop re-keying data and start trusting that every order placed in your front-end system appears in BC without human intervention.
The pattern applies equally to purchase orders, customer records, item updates, and any other BC entity with an API endpoint. Related Power Automate patterns: Teams Adaptive Card approvals and Azure Service Bus integration. Before pushing customer or item records into Business Central via the API, run Dynamics 365 duplicate detection rules against the source CRM data so you don’t propagate duplicates into your ERP master. To safely package the AL extensions that often accompany this kind of integration, see our walkthrough on deploying Business Central extensions, and browse our Business Central consulting locations.
Ready to automate your Business Central data entry? AlphaVima’s Business Central and Power Platform team can build, test, and support your integration. Contact our Business Central team today
Have questions about the BC API or authentication setup? Leave a comment below.
FAQs
Does Business Central's API work with both cloud and on-premises deployments?
Business Central Cloud (SaaS) exposes the full OData v4 REST API out of the box with no configuration. Business Central On-Premises also supports the same API, but you must expose the web services endpoint and configure Azure AD or NavUserPassword authentication separately. Power Automate connects most easily to the cloud version.
What authentication method does the Business Central connector use in Power Automate?
The built-in Power Automate Business Central connector uses OAuth 2.0 with Azure Active Directory. When you create a connection, you sign in with your Microsoft 365 credentials and grant the connector the required permissions. For automated flows using service accounts, use a dedicated service account with appropriate Business Central permissions.
How do I find the correct API endpoint URL for a custom Business Central page?
Publish your page as a web service in Business Central under Administration → Web Services → New, select OData V4 as the type, and note the OData URL shown. Standard Business Central API base URLs follow the format: api.businesscentral.dynamics.com/v2.0/{tenantId}/{environment}/api/v2.0/.
Can I call Business Central APIs from Power Automate without using the built-in connector?
Yes. You can use the HTTP with Azure AD action to call Business Central's OData endpoints directly, giving you more flexibility for custom APIs and batch operations. Register an app in Azure AD, grant it Business Central API permissions, and use the client credentials flow for service-to-service calls.
What is the difference between a standard Business Central API and a custom API page?
Standard APIs (v2.0 endpoints) are maintained by Microsoft and expose common entities like customers, vendors, and items. Custom API pages are AL-coded pages you create in a Business Central extension - they expose any table or business logic as a RESTful endpoint, but require an Extension development environment with VS Code and the AL Language extension.
How do I handle pagination when retrieving large datasets from Business Central?
Business Central OData responses use server-side paging with an @odata.nextLink property. In Power Automate, use a Do Until loop that checks for the presence of nextLink and continues making requests until it is absent, accumulating all records into an array variable.
Can I trigger a Power Automate flow directly from within Business Central?
Yes. Business Central supports Power Automate triggers through its built-in Flow integration. Users can run flows from action buttons on Business Central pages, and developers can programmatically raise events using AL business events that Power Automate can subscribe to.
What are the rate limits for the Business Central API?
Microsoft applies OData call limits of approximately 5,000 calls per 5-minute window per environment for production tenants. Heavy integration flows should use batch requests via OData $batch, implement exponential back-off on 429 responses, and schedule bulk sync jobs during off-peak hours to avoid throttling.
Need Help Automating Business Central Sales Orders?
- Integrate Power Automate with Business Central APIs
- Automate sales order creation from any source
- Configure secure OAuth authentication and workflows