


Dynamics 365 Finance & Operations (F&O) holds some of your most critical business data – general ledger entries, vendor transactions, customer invoices, inventory movements, and production records. When this data needs to flow into data warehouses, Power BI reports, third-party analytics tools, or archival systems, you need a reliable, configurable export mechanism.
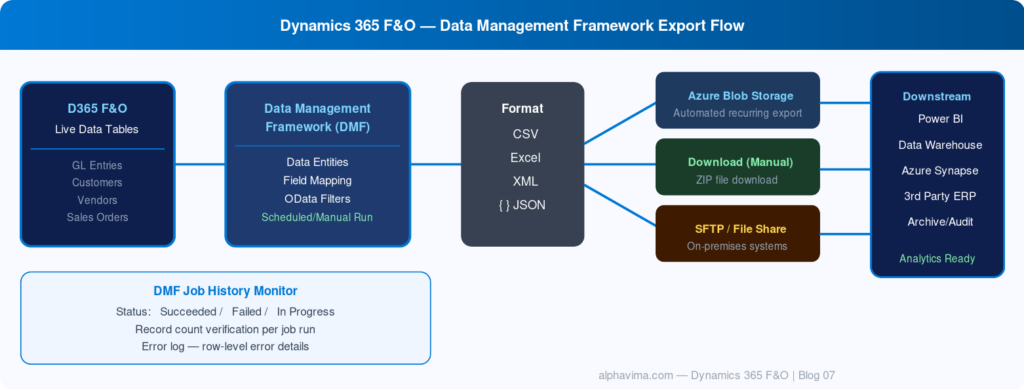
The Data Management Framework (DMF) is the built-in D365 F&O tool designed exactly for this purpose. It allows you to configure data export projects using data entities, schedule recurring exports, push data to Azure Blob Storage or SFTP, and monitor every run through a comprehensive job history.
In this guide, you will learn how to set up a data export project in D365 F&O using DMF, configure a recurring export, and route the output to a destination your reporting team can consume. This pattern sits at the intersection of Alphavima’s Microsoft Business Central ERP consulting and Azure data engineering services.
What Is the Data Management Framework?
The Data Management Framework (also called DIXF – Data Import Export Framework) is a module within Dynamics 365 F&O that manages bulk data movement. It uses data entities – logical abstractions over F&O database tables – as the unit of data transport.
Key DMF capabilities:
- Export structured data from F&O to flat files (CSV, Excel, XML)
- Import data into F&O from external sources
- Recurring integrations for automated, scheduled data flows
- Azure integration – push exports directly to Azure Blob Storage or Data Lake
DMF is entirely configuration-driven – no custom development required for standard export scenarios.
For organisations connecting F&O data to SQL for reporting, see our guide on connecting D365 CRM to SQL Server for a complementary approach.
Prerequisites
- System Administrator or Data Management Administrator role in D365 F&O
- A D365 F&O cloud environment (version 10.0 or later recommended)
- An Azure Blob Storage account (if you want to export to cloud storage)
- Basic familiarity with D365 F&O navigation
How DMF Works
A DMF export follows this process:
- Create a Data Project – define what data to export and in what format
- Add Data Entities – select the F&O entities (e.g., Customer V3, General Journal) to include
- Map output format – choose CSV, Excel, XML, or JSON
- Configure destination – local download, Azure Blob, or SFTP
- Run or schedule – execute once or set up a recurring job
- Monitor – review run history, error logs, and record counts
Step 1: Navigate to the Data Management Workspace
- In D365 F&O, click the module navigation (hamburger menu) → Data management → Data management.
- You will see the Data Management workspace with tiles for Import, Export, Jobs, and Configuration.
- Click Export to begin creating an export project.
Step 2: Create an Export Data Project
- On the Export page, click New.
- Fill in:
- Project name: Customer Master Export – Monthly (or a meaningful name)
- Project description: Brief description of the export purpose
- Source data format: CSV (recommended for broad compatibility) or Excel
- Click Save.
You are now in the export project configuration screen.
Step 3: Add Data Entities
Data entities define what F&O data is exported. Each entity maps to one or more underlying database tables and presents a clean, de-normalised view.
- In your export project, click Add entity.
- In the Entity name field, search for the entity you need. Common entities include:
Entity Name | Description |
Customers V3 | Customer master data |
Vendors V2 | Vendor master data |
Customer Transactions | Posted customer invoice/payment records |
General Journal Lines | Posted GL transactions |
Released Products V2 | Item/product master |
Inventory On-Hand V2 | Current inventory balances |
Sales Order Headers V2 | Sales order header data |
- Select your entity (e.g., Customers V3).
- Set the Target data format to CSV.
- Click Add.
Repeat for additional entities – you can include multiple entities in one export project; each produces a separate file.
Tip: Type part of a word in the entity search box – DMF searches entity names and entity labels simultaneously. If you can’t find an entity, check the D365 F&O data entities reference on Microsoft Docs.
Step 4: Filter the Data (Optional but Recommended)
For large datasets, exporting all records every time is inefficient. Add a filter to export only what you need.
- Select your entity in the project.
- Click Filter.
- The Advanced Filter dialog opens with full query capabilities.
- Example filter for active customers only:
- Table: DirPartyTable (or the entity’s base table)
- Field: IsSuspended
- Criteria: No
- For date-filtered exports (e.g., transactions since last export):
- Field: TransDate
- Criteria: >= → use a variable date
Tip for incremental exports: Use the dataAreaId field to scope exports to a specific legal entity, and combine with date filters to build incremental data pipelines.
Step 5: Configure the Export Destination
Option A: Download as File (Simple)
- Leave the destination as default – when you run the job manually, DMF generates a downloadable zip file.
- Click Export now to run immediately and download results.
Option B: Azure Blob Storage (Recommended for Automation)
- First, configure a storage destination in DMF. Go to Data management → Configure data sources (or via Framework parameters → Data connections).
- Add a new data source:
- Name: Azure Blob – DataExports
- Type: Azure Blob
- Connection string: Paste your Azure Storage connection string
- Container name: d365-exports
- Back in your export project, set Output data entity file name pattern (e.g., CustomerExport_{date}.csv).
Step 6: Set Up a Recurring Export
For automated, scheduled exports (nightly, weekly, etc.), use the Recurring data job feature.
- In your export project, click Create recurring data job.
- Name the job: Customer Master – Nightly Export
- Configure the schedule:
- Start date/time: Set to tonight at 11:00 PM
- Recurrence pattern: Daily / Every 1 day
- End by: Leave blank for indefinite
- Set the Data project to your export project.
- Set the Application ID (this is the Azure App ID used for authentication – create an App Registration in Azure AD with D365 F&O API permissions).
- Click OK.
The recurring job will now run on schedule, pushing export files to your configured destination.
Note: Recurring integrations use a message queue (Azure Service Bus internally) to guarantee delivery. Monitor job statuses in Data management → Job history.
Step 7: Monitor and Review Job History
- Navigate to Data management → Job history.
- Find your export job by name.
- Review:
- Status: Succeeded / Failed / In Progress
- Records exported: Verify record count is as expected
- Errors: Click View execution details to see row-level errors
For failed jobs, the most common causes are:
- Missing data entity mapping – column in target doesn’t map to entity field
- Filter syntax errors – check your OData/filter expressions
- Azure Blob permission denied – verify the storage account connection string
For combining F&O export data with Power BI dashboards, check our guide on exporting Power BI data to SQL Server and Power BI CSV export via Power Automate.
Advanced: Export to Azure Data Lake Gen2
For enterprise data engineering pipelines, D365 F&O supports native export to Azure Data Lake Gen2 via the Finance and Operations Data Lake feature (also called Synapse Link for Finance and Operations).
- In D365 F&O, navigate to System administration → Feature management.
- Enable Export to Azure Data Lake.
- Go to System administration → Export to Azure Data Lake → configure your storage account.
- Select the tables or entities to export.
- Enable Change data option to get CDC (Change Data Capture) incremental updates.
This approach is recommended for large-scale analytics and data engineering workloads.
Best Practices
- Use entity-level filters to limit export scope – never export more data than needed
- Schedule exports in off-peak hours to avoid performance impact on F&O
- Monitor record counts – a sudden drop usually indicates a filter issue or data problem
- Version your export projects – use meaningful names including dates or version numbers
- Test in UAT before production – always validate your export mappings and filters in a test environment first
- Document your data entities – record which entities map to which business process for future maintainers
Conclusion
The Data Management Framework is one of the most powerful and underused features in Dynamics 365 F&O. With the right configuration, it can serve as the backbone of your data distribution strategy – feeding reporting tools, data lakes, archive systems, and downstream business applications with clean, reliable F&O data on a schedule that suits your business.
Start with the core master data entities (Customers, Vendors, Items) and expand to transactional entities as your confidence with the framework grows.
Need help setting up a D365 F&O data export pipeline? AlphaVima’s F&O consultants can design and implement your entire data management strategy. Get in touch today.
FAQs
What file formats does the Data Management Framework support for export?
DMF supports CSV, Excel (XLSX), XML, and fixed-width text formats out of the box. For analytics scenarios, you can configure exports to Azure Data Lake Storage Gen2 via BYOD or Azure Synapse Link, which writes data in Parquet format. CSV is the most commonly used format for downstream system integrations.
How is DMF different from Excel Add-in exports in Dynamics 365 F&O?
The Excel Add-in is designed for small, interactive data exports and edits - it is not suitable for large volumes or scheduled automation. DMF handles bulk operations with millions of records, supports incremental exports via change tracking, can be scheduled, and integrates with Azure Data Factory pipelines. Use the Excel Add-in for ad-hoc small exports; use DMF for production integrations.
Can I schedule DMF export jobs to run automatically without manual intervention?
Yes. Use the Recurring Integration REST API or the Job scheduling feature within the Data Management workspace to set up recurring jobs. You can also trigger DMF jobs programmatically from Azure Logic Apps, Power Automate, or Azure Data Factory - the recommended pattern for enterprise integration pipelines.
What is the purpose of the Staging Table in the DMF process?
The Staging Table is an intermediate buffer between the DMF data entity and the final destination. During export, data is written to staging first where you can inspect, transform, or validate it. During import, data lands in staging where validations run before committing to the actual F&O tables. Staging tables make error recovery much easier.
How do I export only records that have changed since the last export (incremental export)?
Enable Change Tracking on the relevant F&O data entity in the Data Management workspace under Entity settings → Enable change tracking. Once enabled, DMF tracks record-level changes and you can select "Changed records" when configuring the export job. This dramatically reduces export volumes for large entities.
What should I do if an import job fails partway through?
Check the Execution log in the Data Management workspace - it shows which records succeeded and failed with specific error messages. Fix the underlying data issues (usually validation or mapping errors), then use the Re-submit failed records option to process only the failed subset without re-importing the entire file.
Can DMF export data from custom tables created by ISVs or customer extensions?
Yes. Any table in Dynamics 365 F&O can be exposed as a data entity. For custom tables, create a custom data entity in X++ using the Data Entity wizard in Visual Studio. Once deployed, it appears in DMF and can be used for import and export just like standard Microsoft entities.
Is there a size or record limit for a single DMF export job?
There is no hard record count limit, but very large exports should be split into smaller batches using filters such as date ranges or company codes to avoid timeouts and memory pressure on the AOS. Microsoft recommends keeping individual file packages under 50 MB for reliable processing.
Need Help Setting Up D365 F&O Data Exports?
- Configure DMF export projects
- Automate recurring exports
- Connect Azure Blob, SFTP, and reporting tools
Related reading: Azure Synapse Link for Dataverse for near real-time data movement, Microsoft Fabric for data analytics as your downstream destination, and Power BI Row-Level Security to secure exported data in your reports. Before scheduling a recurring DMF export, clean your source data with Dynamics 365 duplicate detection rules so downstream reports start from a single source of truth. Browse our Business Central ERP consulting locations for a team near you.