


Adding a custom domain and SSL certificate to your Microsoft Power Pages site creates a secure, professional, and brand-aligned experience.
In this step-by-step guide, you’ll learn how to:
Configure CNAME and TXT records in GoDaddy DNS
Add and verify a custom domain in Power Pages
Bind an SSL certificate – either auto-generated or manual
Whether you’re an admin or a Power Platform developer, this tutorial helps you ensure your Power Pages portal is live, secure, and ready for public access.
Prerequisites
Before starting, make sure you have the following:
GoDaddy account access with DNS management privileges
An active and provisioned Microsoft Power Pages portal
An SSL certificate (.pfx file) – or plan to use the auto-generated certificate provided by Power Pages
💡 Tip: If your SSL certificate is in a different format, you can convert it using a tool like InterSSL PFX Converter.
Step 1: Add or Verify a CNAME Record in GoDaddy DNS
To map your custom domain to Microsoft Power Pages, begin by adding a CNAME record in your GoDaddy DNS settings.
Follow these steps:
Log in to your GoDaddy account
Navigate to My Products > Domains, then select your domain (e.g.,
yourdomain.com)Click Manage DNS
Under Records, click “Add” (or “Edit” if the record already exists)
Fill in the CNAME details:
Type: CNAME
Host:
portalPoints to:
yourportal.powerappsportals.comTTL: 1 Hour
Click Save
📌 Note: Replace
yourportal.powerappsportals.comwith the actual URL of your Power Pages portal.
Step 2: Check CNAME Propagation Globally
After setting up the CNAME record in GoDaddy, it’s important to confirm that the change has propagated across DNS servers worldwide.
Here’s how to check:
- Visit whatsmydns.net
- In the search box, enter your subdomain – for example:
portal.yourdomain.com - From the dropdown, select CNAME
- Click Search
- You should see multiple green checks and the value pointing to your Power Pages portal
⚠️ Note: If your domain is not resolving correctly, wait 15-30 minutes and check again. DNS propagation can take up to 24 hours.
Why this matters:
Verifying propagation ensures that your domain correctly maps to the Power Pages environment before applying SSL or proceeding with TXT verification.
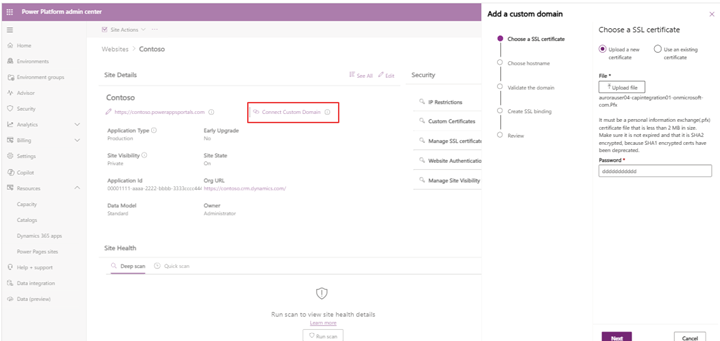
Step 3: Add Your Custom Domain in Microsoft Power Pages
Once your DNS records are set up and propagating, it’s time to add the domain to your Power Pages site.
Follow these steps:
Go to the Power Platform Admin Center
Navigate to:
Environments → Select your environment → Power Pages site → Custom DomainsClick + Add Custom Domain
In the domain field, enter your mapped subdomain:
Example:portal.yourdomain.comUpload your SSL certificate (.pfx) and provide the associated password
Don’t have a .pfx? Use this free SSL converter
Troubleshooting Tips:
If the custom domain doesn’t register or validate:
Refresh the Power Platform Admin Center
Clear your browser cache or open in Incognito Mode
Try a different browser (Chrome, Edge, Firefox)
Once saved, your domain will appear under the Custom Domains list with a “Pending Validation” status.
Step 4: SSL Binding for Your Custom Domain
Once your domain is successfully added and validated, Power Pages will automatically attempt to bind an SSL certificate to secure your custom domain.
Here’s what to expect:
If successful, an SSL certificate will be auto-generated and bound to your domain
It may take a few minutes for binding to complete – refresh the page to check status
What if SSL binding fails?
If the SSL certificate doesn’t bind automatically:
Wait a few minutes and refresh your browser
If it still fails, manually upload a
.pfxcertificate from your SSL provider (e.g., GoDaddy)Return to the Custom Domains panel and retry the validation
🔐 SSL ensures your Power Pages site is accessed securely via HTTPS – essential for data protection and SEO.
Step 5: Add a TXT Record in GoDaddy for Domain Verification
To verify domain ownership, Microsoft Power Pages requires a TXT record in your GoDaddy DNS settings.
Steps to Add the TXT Record:
Sign in to your GoDaddy account
Go to My Products → Domains → Manage DNS
Click “Add Record”
Select the following details:
Type:
TXTHost:
_dnsauth.portal(Use the exact host value provided by Power Pages if different)
TXT Value: (Copy this from your Power Pages domain setup page)
TTL:
1 Hour
Click Save
This TXT record helps Microsoft validate that you own the domain before enabling secure binding.
Step 6: Verify TXT Record Propagation Globally
Once your TXT record is added in GoDaddy, the next step is to confirm that it has propagated across global DNS servers.
How to check TXT propagation:
Visit whatsmydns.net
In the search field, enter your full TXT record host, like:
_dnsauth.portal.yourdomain.comFrom the dropdown, select TXT
Click Search
Check that the expected TXT value is visible from most (or all) DNS nodes
DNS propagation can take from a few minutes to 24 hours. If you don’t see the value right away, wait and retry later.
Why this matters:
Verifying TXT propagation ensures Microsoft Power Pages can confirm domain ownership – a critical step before final SSL binding and public launch.
Step 7: Final Domain Validation in Power Pages
Once the TXT record has propagated successfully, it’s time to complete the process by validating your domain in Microsoft Power Pages.
Final Validation Steps:
Go back to the Power Platform Admin Center
Navigate to:
Your environment → Power Pages site → Custom DomainsFind your domain in the list (e.g.,
portal.yourdomain.com)Click the “Validate” button next to it
What happens next?
If the TXT record is found and correct, Power Pages will confirm ownership
SSL will be automatically applied to your custom domain
Your site will now be live at https://portal.yourdomain.com – secured and ready to go!
🔐 Note: You can re-check the SSL certificate status by revisiting the Custom Domains panel or viewing your site in a browser with HTTPS.
Final Thoughts
Setting up a custom domain and SSL certificate in Microsoft Power Pages using GoDaddy DNS may seem technical, but this step-by-step process simplifies it. From adding CNAME and TXT records to validating ownership and binding SSL – each step ensures your site is secure, branded, and production-ready.
⏳ DNS propagation may take some time, so be patient during validation. Tools like whatsmydns.net can help you monitor progress.
Once completed, your Power Pages portal will be accessible at your custom domain with HTTPS encryption, offering users a trustworthy and professional experience.
Pro Tip:
If you’re managing multiple environments or domains, consider documenting your DNS configurations and certificate details for future audits or rollbacks.
Need help setting up a custom domain for your Power Pages site?
Alphavima helps you configure and secure your Microsoft Power Pages domain for a seamless user experience.
FAQs
How can I connect a custom domain to Microsoft Power Pages using GoDaddy DNS?
You can connect a custom domain to Microsoft Power Pages by configuring a CNAME record in your GoDaddy DNS settings and validating it through the Power Platform admin center. Once validated, upload an SSL certificate and complete the domain binding steps - no code required. This blog provides a step-by-step guide using a real GoDaddy DNS example.
Do I need to write code to enable SSL for a custom domain in Power Pages?
No, you don't need to write any code. Microsoft Power Pages offers a no-code interface to upload your SSL certificate (in PFX format), choose a hostname, and complete domain validation. The SSL binding process is handled entirely through the Power Platform admin portal.
What type of SSL certificate is required for Microsoft Power Pages?
Power Pages requires a PFX (Personal Information Exchange) SSL certificate file with a private key. This certificate must be password protected and match the custom domain you're binding. You can generate a PFX file using tools like OpenSSL or export it from a certificate authority.
Can I use Power Pages without buying a custom domain?
Yes, Power Pages provides a default Microsoft subdomain (e.g., yourorg.powerappsportals.com). However, for branding and trust, using your own domain with SSL is recommended. This guide walks you through securing a custom domain via GoDaddy DNS.
How does this differ from adding a file upload to Power Apps Portals?
Custom domain + SSL setup focuses on domain branding and security, whereas file uploads relate to form submissions. If you want to securely upload documents via a Power Apps portal, refer to our step-by-step guide:
Secure File Upload in PowerApps for Dynamics 365
Can I integrate CRM and workflows once the domain setup is complete?
Yes, once your portal is secured with a custom domain and SSL, you can layer in Dynamics 365 CRM, Power Automate workflows, and external integrations. Learn more about automating flows in this blog:
Restore Cloud Flows Using Version History