


Adding a custom domain and SSL certificate to your Microsoft Power Pages site creates a secure, professional, and brand-aligned experience.
In this step-by-step guide, you’ll learn how to:
Configure CNAME and TXT records in GoDaddy DNS
Add and verify a custom domain in Power Pages
Bind an SSL certificate – either auto-generated or manual
Whether you’re an admin or a Power Platform developer, this tutorial helps you ensure your Power Pages portal is live, secure, and ready for public access.
Prerequisites
Before starting, make sure you have the following:
GoDaddy account access with DNS management privileges
An active and provisioned Microsoft Power Pages portal
An SSL certificate (.pfx file) – or plan to use the auto-generated certificate provided by Power Pages
💡 Tip: If your SSL certificate is in a different format, you can convert it using a tool like InterSSL PFX Converter.
Step 1: Add or Verify a CNAME Record in GoDaddy DNS
To map your custom domain to Microsoft Power Pages, begin by adding a CNAME record in your GoDaddy DNS settings.
Follow these steps:
Log in to your GoDaddy account
Navigate to My Products > Domains, then select your domain (e.g.,
yourdomain.com)Click Manage DNS
Under Records, click “Add” (or “Edit” if the record already exists)
Fill in the CNAME details:
Type: CNAME
Host:
portalPoints to:
yourportal.powerappsportals.comTTL: 1 Hour
Click Save
📌 Note: Replace
yourportal.powerappsportals.comwith the actual URL of your Power Pages portal.
Step 2: Check CNAME Propagation Globally
After setting up the CNAME record in GoDaddy, it’s important to confirm that the change has propagated across DNS servers worldwide.
Here’s how to check:
- Visit whatsmydns.net
- In the search box, enter your subdomain – for example:
portal.yourdomain.com - From the dropdown, select CNAME
- Click Search
- You should see multiple green checks and the value pointing to your Power Pages portal
⚠️ Note: If your domain is not resolving correctly, wait 15-30 minutes and check again. DNS propagation can take up to 24 hours.
Why this matters:
Verifying propagation ensures that your domain correctly maps to the Power Pages environment before applying SSL or proceeding with TXT verification.
Step 3: Add Your Custom Domain in Microsoft Power Pages
Once your DNS records are set up and propagating, it’s time to add the domain to your Power Pages site.
Follow these steps:
Go to the Power Platform Admin Center
Navigate to:
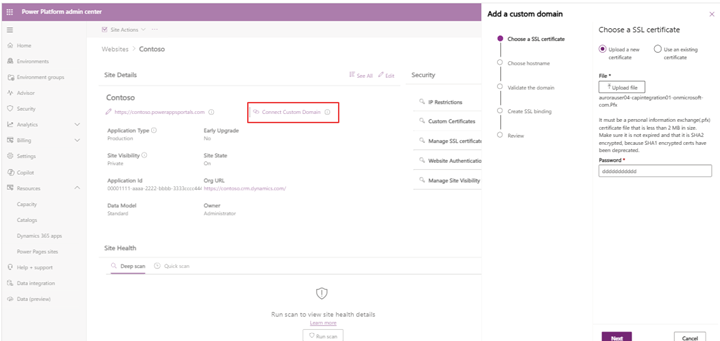
Environments → Select your environment → Power Pages site → Custom DomainsClick + Add Custom Domain
In the domain field, enter your mapped subdomain:
Example:portal.yourdomain.comUpload your SSL certificate (.pfx) and provide the associated password
Don’t have a .pfx? Use this free SSL converter
Troubleshooting Tips:
If the custom domain doesn’t register or validate:
Refresh the Power Platform Admin Center
Clear your browser cache or open in Incognito Mode
Try a different browser (Chrome, Edge, Firefox)
Once saved, your domain will appear under the Custom Domains list with a “Pending Validation” status.
Step 4: SSL Binding for Your Custom Domain
Once your domain is successfully added and validated, Power Pages will automatically attempt to bind an SSL certificate to secure your custom domain.
Here’s what to expect:
If successful, an SSL certificate will be auto-generated and bound to your domain
It may take a few minutes for binding to complete – refresh the page to check status
What if SSL binding fails?
If the SSL certificate doesn’t bind automatically:
Wait a few minutes and refresh your browser
If it still fails, manually upload a
.pfxcertificate from your SSL provider (e.g., GoDaddy)Return to the Custom Domains panel and retry the validation
🔐 SSL ensures your Power Pages site is accessed securely via HTTPS – essential for data protection and SEO.
Step 5: Add a TXT Record in GoDaddy for Domain Verification
To verify domain ownership, Microsoft Power Pages requires a TXT record in your GoDaddy DNS settings.
Steps to Add the TXT Record:
Sign in to your GoDaddy account
Go to My Products → Domains → Manage DNS
Click “Add Record”
Select the following details:
Type:
TXTHost:
_dnsauth.portal(Use the exact host value provided by Power Pages if different)
TXT Value: (Copy this from your Power Pages domain setup page)
TTL:
1 Hour
Click Save
This TXT record helps Microsoft validate that you own the domain before enabling secure binding.
Step 6: Verify TXT Record Propagation Globally
Once your TXT record is added in GoDaddy, the next step is to confirm that it has propagated across global DNS servers.
How to check TXT propagation:
Visit whatsmydns.net
In the search field, enter your full TXT record host, like:
_dnsauth.portal.yourdomain.comFrom the dropdown, select TXT
Click Search
Check that the expected TXT value is visible from most (or all) DNS nodes
DNS propagation can take from a few minutes to 24 hours. If you don’t see the value right away, wait and retry later.
Why this matters:
Verifying TXT propagation ensures Microsoft Power Pages can confirm domain ownership – a critical step before final SSL binding and public launch.
Step 7: Final Domain Validation in Power Pages
Once the TXT record has propagated successfully, it’s time to complete the process by validating your domain in Microsoft Power Pages.
Final Validation Steps:
Go back to the Power Platform Admin Center
Navigate to:
Your environment → Power Pages site → Custom DomainsFind your domain in the list (e.g.,
portal.yourdomain.com)Click the “Validate” button next to it
What happens next?
If the TXT record is found and correct, Power Pages will confirm ownership
SSL will be automatically applied to your custom domain
Your site will now be live at https://portal.yourdomain.com – secured and ready to go!
🔐 Note: You can re-check the SSL certificate status by revisiting the Custom Domains panel or viewing your site in a browser with HTTPS.
Final Thoughts
Setting up a custom domain and SSL certificate in Microsoft Power Pages using GoDaddy DNS may seem technical, but this step-by-step process simplifies it. From adding CNAME and TXT records to validating ownership and binding SSL – each step ensures your site is secure, branded, and production-ready.
⏳ DNS propagation may take some time, so be patient during validation. Tools like whatsmydns.net can help you monitor progress.
Once completed, your Power Pages portal will be accessible at your custom domain with HTTPS encryption, offering users a trustworthy and professional experience.
Pro Tip:
If you’re managing multiple environments or domains, consider documenting your DNS configurations and certificate details for future audits or rollbacks.
Need help setting up a custom domain for your Power Pages site?
Alphavima helps you configure and secure your Microsoft Power Pages domain for a seamless user experience.
FAQs
What Is Power Pages Custom Domain Setup GoDaddy and Why Does It Matter?
Power Pages custom domain setup GoDaddy is the process of connecting a GoDaddy-managed domain name — such as www.yourcompany.com — to a Microsoft Power Pages portal instead of using the default microsoftcrmportals.com subdomain. This configuration gives your portal a professional, branded web address that aligns with your organization's identity and builds trust with end users.
By default, every Power Pages site is published under a Microsoft-generated subdomain. While this works for testing and internal use, most businesses and nonprofits require a custom domain before launching publicly. GoDaddy is one of the most widely used domain registrars in Canada and the US, making it the most common scenario AlphaVima clients encounter when deploying Power Pages portals.
Completing the Power Pages custom domain setup GoDaddy process correctly also ensures your SSL certificate is active, securing user data with HTTPS encryption. Without SSL, modern browsers flag your portal as "Not Secure," which can deter visitors and create compliance issues for organizations handling sensitive data.
What Are the Prerequisites Before Connecting a Custom Domain to Power Pages?
Before starting the custom domain configuration, you need four things in place. First, your Power Pages site must be published and running — unpublished portals cannot accept custom domain mappings. Second, you must have access to the GoDaddy account that controls your domain's DNS settings, with permission to create CNAME and TXT records. Third, your domain must not already be mapped to another active website, as conflicting DNS records will cause validation to fail. Fourth, your Power Platform environment must have a valid Power Pages subscription — trial environments may not support custom domains.
It is also important to verify that the domain registrar is GoDaddy specifically, as DNS interfaces differ between registrars. If your domain is managed through a different provider, the steps below still apply conceptually, but the exact navigation within the registrar's control panel will vary. AlphaVima has helped clients configure custom domains across GoDaddy, Namecheap, Cloudflare, and Azure DNS.
How Do You Begin the Power Pages Custom Domain Setup GoDaddy Process?
To start the Power Pages custom domain setup GoDaddy process, log into the Power Pages Management Center at make.powerpages.microsoft.com. Select the site you want to configure, then navigate to the "Custom Domains" section under the site's settings panel. Click "Add a custom domain" and enter the full domain name you wish to map — for example, portal.yourcompany.com.
Power Pages will then generate a verification TXT record that you must add to your GoDaddy DNS settings. This record proves domain ownership to Microsoft before the custom domain is activated. Copy this TXT record value carefully — it is a unique string that expires if not verified within 24–48 hours.
Open your GoDaddy account in a separate browser tab, navigate to DNS management for the domain, and add a new TXT record with the host value set to "@" and the value pasted from Power Pages. Save the record and return to Power Pages to click "Verify." DNS propagation typically takes 15–30 minutes for GoDaddy, though it can take up to an hour in some regions.
How Do You Add the Required DNS Records in GoDaddy for Power Pages?
After ownership verification, Power Pages provides a CNAME record that routes traffic from your custom domain to the Microsoft portal infrastructure. In your GoDaddy DNS management panel, create a new CNAME record with the host value set to the subdomain you're mapping (e.g., "portal" if your full domain is portal.yourcompany.com) and the value pointing to the Microsoft-provided CNAME target.
If you are mapping an apex or root domain (e.g., yourcompany.com without a subdomain), GoDaddy supports CNAME forwarding using their "Domain Forwarding" feature, or you can use an ALIAS record if your DNS provider supports it. However, Microsoft generally recommends using a subdomain (www or portal) for Power Pages custom domains, as root domain CNAME records are not universally supported and can cause mail delivery issues.
Once the CNAME is saved, return to the Power Pages Management Center and click "Next" to proceed to SSL configuration. The platform automatically detects the DNS record once it propagates. For more information on Power Pages DNS requirements, visit the Microsoft Power Pages documentation on custom domains.
How Do You Enable SSL on a Power Pages Custom Domain?
Power Pages supports two SSL options: using a Microsoft-managed certificate or uploading your own certificate. For most organizations, the Microsoft-managed option is the easiest — Power Pages automatically provisions and renews a free SSL certificate tied to your custom domain once DNS records are verified. There is no additional cost and no manual renewal process.
If your organization has an existing SSL certificate — for example, a wildcard certificate covering *.yourcompany.com — you can upload it in PFX format through the Power Pages Management Center. This option is common in regulated industries where certificate authority requirements are dictated by compliance policies.
After SSL is configured, Power Pages binds the certificate to your custom domain and enforces HTTPS automatically. HTTP requests are redirected to HTTPS, ensuring all user sessions are encrypted. AlphaVima recommends the Microsoft-managed certificate for most clients undergoing Power Pages custom domain setup GoDaddy deployments, as it eliminates ongoing certificate management overhead and reduces the risk of expiry-related outages.
What Are Common Errors During Power Pages Custom Domain Setup GoDaddy?
The most frequent error in Power Pages custom domain setup GoDaddy projects is DNS verification failure. This occurs when the TXT record is entered incorrectly in GoDaddy — usually because the record value was copied with extra spaces, or the host field was set incorrectly. Double-check that the TXT record host is "@" (for root) or the exact subdomain prefix, and that the value matches exactly what Power Pages provided.
The second common issue is CNAME propagation delay. After adding the CNAME record in GoDaddy, some regions experience delays of 1–4 hours before Power Pages can detect the record. If the verification status stays "Pending" for more than two hours, clear your DNS cache with ipconfig /flushdns and retry.
The third issue is SSL binding failure, which often occurs when the domain was previously mapped to another service and a cached SSL certificate from the old provider conflicts. Removing the old DNS records entirely and waiting for propagation before proceeding with Power Pages SSL activation resolves this in most cases. Our team at AlphaVima troubleshoots these issues regularly — explore our Power Apps development services and Microsoft Copilot Studio services to see our full Power Platform expertise.
How Long Does DNS Propagation Take After Power Pages Custom Domain Configuration?
DNS propagation time after Power Pages custom domain setup GoDaddy configuration typically ranges from 15 minutes to 4 hours for most users. GoDaddy's DNS infrastructure propagates changes faster than many other registrars, and in most cases the CNAME and TXT records are resolvable within 30–60 minutes. However, depending on your ISP's DNS cache and geographic location, full global propagation can take up to 48 hours in rare cases.
You can monitor propagation progress using free tools like whatsmydns.net or dnschecker.org, which show whether your DNS records have propagated across global DNS servers. Enter your domain and record type (CNAME or TXT) to see a worldwide propagation map. If the record is visible in most regions but Power Pages still shows "Pending," try clicking the "Verify" button again — it sometimes requires a manual refresh after propagation completes.
During propagation, your portal may briefly be inaccessible at the custom domain. Plan your domain cutover for off-peak hours and notify users in advance if your portal handles time-sensitive transactions.
How Does AlphaVima Support Power Pages Custom Domain Setup GoDaddy Projects?
AlphaVima Technologies provides end-to-end support for Power Pages deployments, including Power Pages custom domain setup GoDaddy configurations for clients across Toronto and across Canada. Our certified Power Platform architects handle the full DNS configuration, SSL certificate management, and post-launch verification — so your team can focus on portal content and user adoption rather than technical DNS troubleshooting.
Beyond domain setup, AlphaVima designs and deploys Power Pages portals for customer self-service, partner portals, nonprofit intake forms, and grant management workflows. Each engagement includes a security review, performance optimization, and training sessions so your internal team can manage portal content independently after go-live.
Whether you are setting up your first Power Pages portal or migrating an existing Dynamics 365 portal to the new Power Pages infrastructure, AlphaVima brings the Microsoft-certified expertise to complete the project on time and within budget. Visit our nonprofit CRM solutions page to learn how we deploy Power Pages for nonprofit organizations across Canada.