


Integrate your Shopify store with Dynamics 365 for timely order fulfilment, accurate product availability, and real-time visibility into order statuses!
Follow the steps below and you’ll be ready to get started in no time.
Overview:
Integrating Shopify with Microsoft Dynamics 365 automates workflows and reduces manual data entry. It also ensures real-time updates of customer, product, and order data across both platforms. As a result, businesses can avoid discrepancies and improve accuracy. By configuring Logic Apps and setting up Webhooks, teams can keep both systems in sync without extra effort.
Learn how to integrate Microsoft CRM accounts, products, and sales orders with Shopify customers, items, and orders by using Azure portal and Webhooks.
Design:
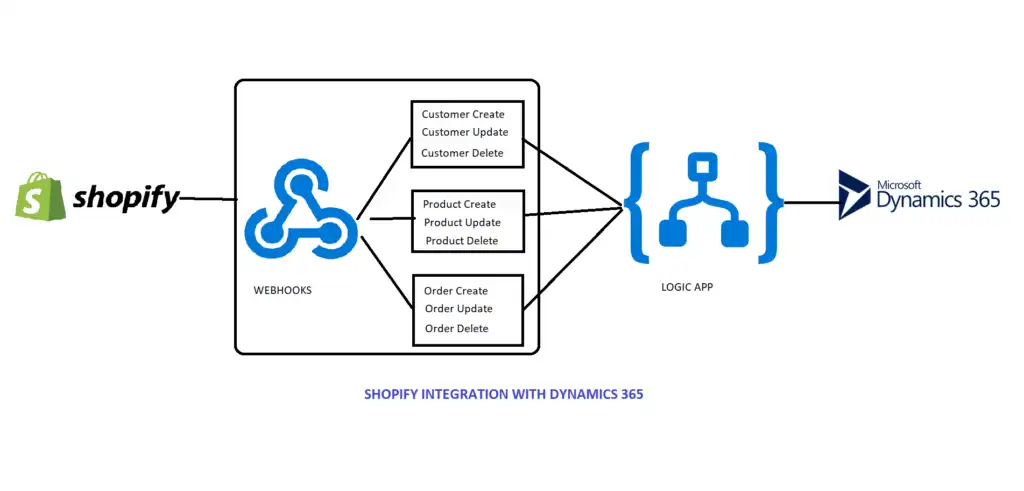
Steps for Shopify integration with Microsoft Dynamics 365
For this integration, you will first need to download the Azure Logic Apps.
With the help of this logic apps, you will be able to connect to Dynamics365.
How to create logic apps:
1. First, go to https://portal.Azure.com and create an Azure account. Note: this integration will require an Azure subscription.
2. Next, look up the logic app in the search bar, select the logic app, and then create the logic app as shown below.
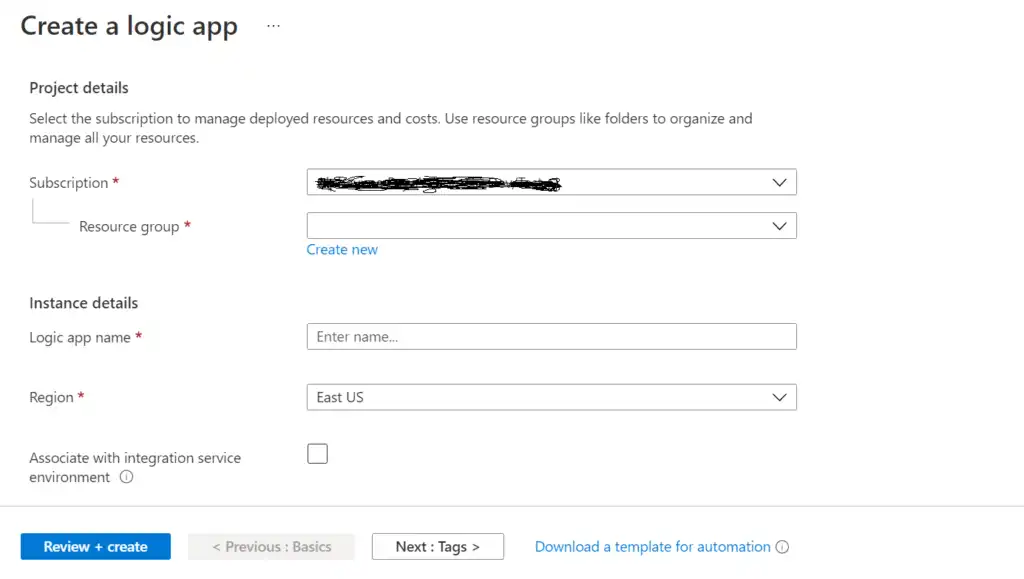
3. While creating a logic app, select Subscription and Resource group (if you don’t have a resource group you can create one) and provide a unique logic app name. Select region and then click on the “Review + create” button.
4. After creating the logic app, next create a Shopify account and Webhooks.
You can explore additional capabilities of Logic Apps in the Azure Logic Apps documentation.
How to create a Shopify account and Webhooks:
1. Create the Shopify “14 days free trial” account at www.shopify.com.
2. Next, create a store in Shopify (which will produce an admin page, as seen below).
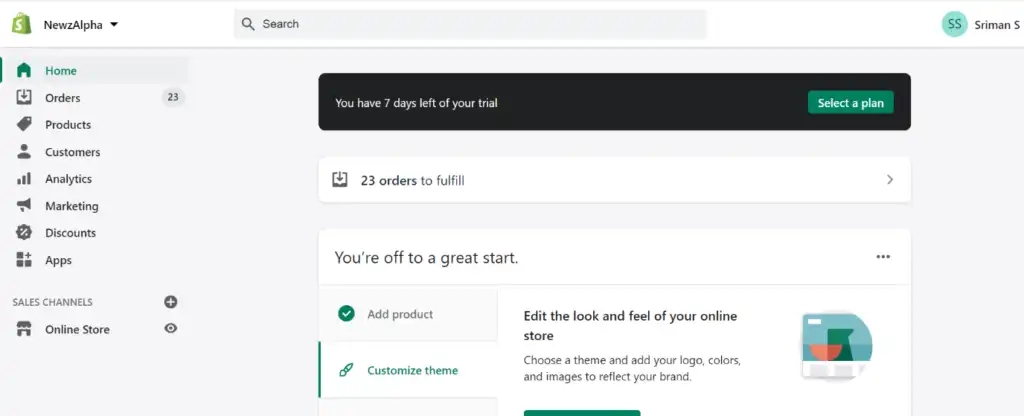
You’re off to a great start! In order to migrate customers, products, and orders from Shopify to Dynamics 365, you will need to create a Webhooks account.
Webhooks often use JSON for data exchange. Learn more about JSON formatting on MDN.
To do so, simply follow this schema:
Go to Settings -> Notifications -> Webhooks

3. After creating a webhook, you can then add customers, products and generate orders by using these products and customers, adding whatever details you like to this store.
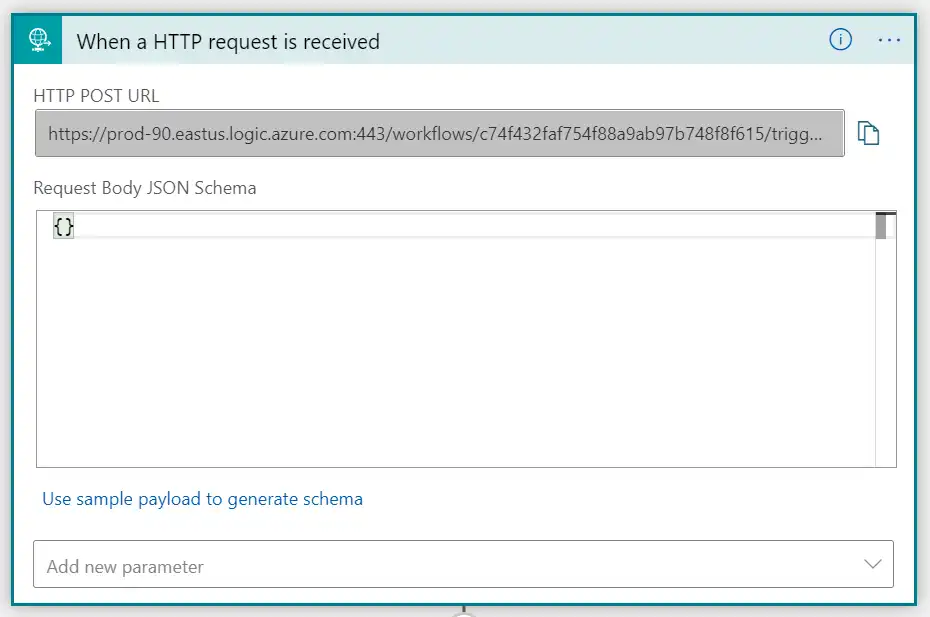
4. After inputting the desired details in Shopify, simply click on the Create Webhook button; a popup will display on the screen, and in that popup, select an event. You’ll need to provide the HTTPS URL from Azure Logic app and also select “format” and the “latest webhook API” version, as shown in below.
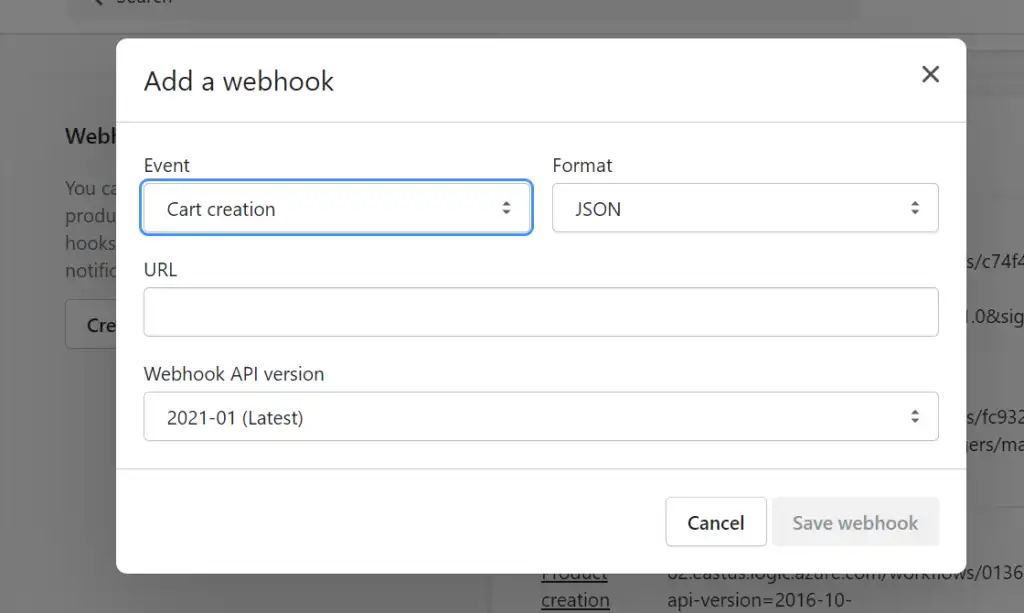
5. When an HTTP request is received, you will need to provide a URL in Azure Logic app. After providing the URL from Azure, click on the save button.
6. This will send notification data to the Logic app, so you can get all details about that event.
7. After completion of Logic app design, just trigger the event in Shopify and see whether it is integrated with Dynamics 365 or not.
Steps for setting up Shopify integration with Microsoft Dynamics 365:
1. First, you need to create a webhook on Shopify with the event and select the format you want (i.e., either Json or XML). Next, you need to give the URL from the Logic app and then select the latest Webhook API version as shown below is for customer creation event.
To learn more about configuring webhooks in Shopify, refer to the official Shopify Webhooks documentation.

Below are currently available events in Shopify.
| Events | Actions |
|---|---|
| Cart creation | it will send a webhook every time a cart is created |
| Cart update | it will send a webhook every time a cart is updated |
| Checkout creation | it will send a webhook every time a checkout is created |
| Checkout deletion | it will send a webhook every time a checkout is deleted |
| Checkout update | it will send a webhook every time a checkout is updated |
| Collection creation | it will send a webhook every time a collection is created |
| Collection deletion | it will send a webhook every time a collection is deleted |
| Collection update | it will send a webhook every time a collection is updated |
| Customer group | creation it will send a webhook every time a customer group is created |
| Customer group | deletion it will send a webhook every time a customer group is deleted |
| Customer group | update it will send a webhook every time a customer group is updated |
| Customer creation | it will send a webhook every time a new customer is created |
| Customer deletion | it will send a webhook every time a customer record is deleted |
| Customer disables | it will send a webhook every time a customer account is disabled |
| Customer enables | it will send a webhook every time a customer account is enabled |
| Customer update | it will send a webhook every time a customer record is updated |
| Draft order creation | it will send a webhook every time a draft order is created |
| Draft order deletion | it will send a webhook every time a draft order is deleted |
| Draft order update | it will send a webhook every time a draft order has been updated |
| Fulfillment creation | it will send a webhook every time fulfillment is created on the order |
| Fulfillment update | it will send a webhook every time fulfillment is updated on the order |
| Order cancellation | it will send a webhook every time an order is canceled |
| Order creation | it will send a webhook every time an order is created |
| Order deletion | it will send a webhook every time an order is deleted |
| Order fulfillment | it will send a webhook every time an order is fulfilled |
| Order payment | it will send a webhook every time an order has been paid |
| Order update | it will send a webhook every time an order has been updated |
| Product creation | it will send a webhook every time a product has been created |
| Product deletion | it will send a webhook every time a product has been deleted |
| Product update | it will send a webhook every time a product has been updated |
| Refund creates | it will send a webhook every time a refund is issued |
| Shop update | it will send a webhook every time a shop property is updated |
| Theme creation | it will send a webhook every time a theme is created |
| Theme deletion | it will send a webhook every time a theme is deleted |
| Theme update | it will send a webhook every time a theme property is updated |
2. You have to provide the below URL from the Logic app to the above picture URL.
3.Next, you will need to create a customer in the Shopify account.
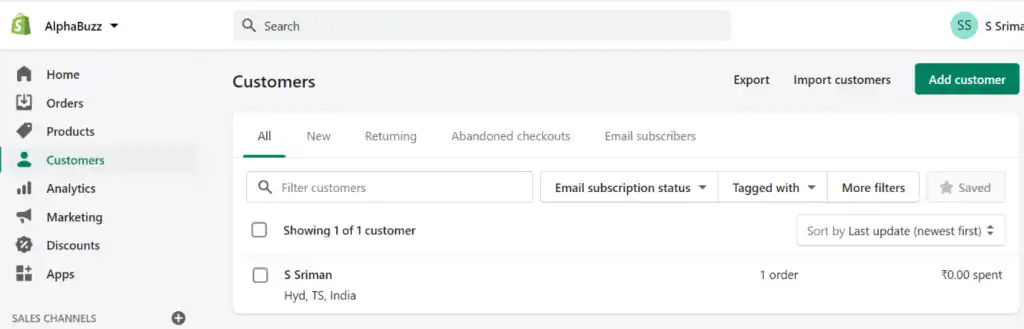
4. Whenever you create a customer in Shopify, Webhook event will be triggered and send data to the Logic app (see below).
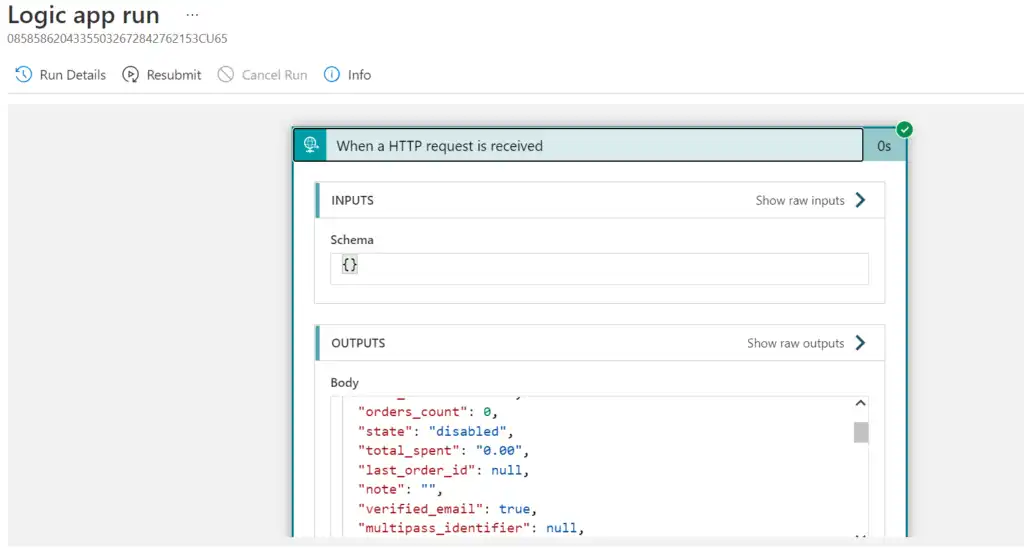

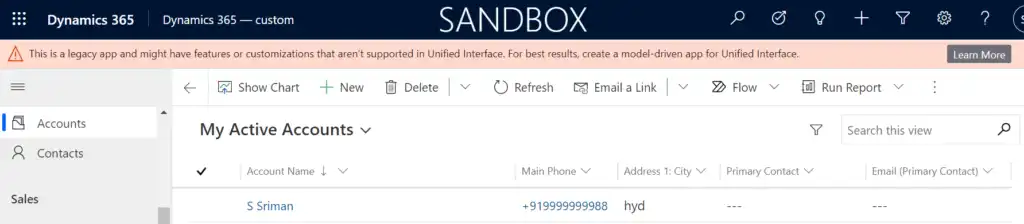
5. If your Logic app is formatted successfully, a record will be created in your Dynamics 365 account as shown below.
Want to connect your Shopify store with Dynamics 365?
Sync orders, inventory, and customer data between Shopify and Microsoft Dynamics 365 with seamless integration support from Alphavima.
FAQs
What Is Shopify Dynamics 365 Integration and Why Does It Matter?
Shopify Dynamics 365 Integration connects your online store with Microsoft's business management platform. It eliminates the need to enter data manually in two separate systems. Orders placed in Shopify flow automatically into Dynamics 365 for fulfillment and finance. Inventory levels sync in both directions to prevent overselling. Customer records update across both platforms without any manual effort. This integration saves hours of administrative work every week. Furthermore, it gives managers a single view of sales, stock, and customer data. Businesses that run both platforms without integration often experience data delays and errors. AlphaVima's Power Apps and integration specialists in Toronto build these connections with reliability and scalability in mind. The result is a leaner, faster e-commerce operation.
How Does Shopify Dynamics 365 Integration Sync Orders and Inventory?
Shopify Dynamics 365 Integration uses a middleware layer or direct API connection to sync data. When a customer places an order in Shopify, the integration sends that order to Dynamics 365 immediately. Dynamics 365 creates a sales order record and updates the available inventory quantity. When stock levels change in Dynamics 365, the integration pushes the updated quantity back to Shopify. This two-way sync prevents customers from buying items that are out of stock. Most integrations use scheduled jobs or real-time webhooks to trigger these updates. Webhooks give you near-instant syncing with minimal server load. Scheduled jobs work better for batch operations like end-of-day reconciliation. Choosing the right sync method depends on your order volume and business requirements.
What Data Flows Between Shopify and Dynamics 365 in the Integration?
A well-designed integration moves several types of data between the two platforms. Orders and order line items flow from Shopify into Dynamics 365 as sales transactions. Customer names, emails, and shipping addresses sync to the Dynamics 365 contact or account records. Product catalog data including SKUs, prices, and descriptions can flow from Dynamics 365 to Shopify. Inventory quantities sync from Dynamics 365 warehouses to Shopify product listings. Payment and fulfillment status updates flow back from Dynamics 365 to Shopify. Additionally, refunds and credit notes can sync to maintain consistent financial records. Each data type requires its own mapping configuration. Incorrect mappings cause data mismatches that are difficult to detect and fix after the fact.
Can You Connect Shopify to Dynamics 365 Without Custom Code?
Yes, several no-code and low-code options exist for Shopify Dynamics 365 Integration. Microsoft AppSource lists connector apps built specifically for this integration scenario. Power Automate also offers pre-built Shopify and Dynamics 365 connectors for common data flows. These tools let you configure mappings through a graphical interface. However, no-code connectors have limitations for complex business logic or high-volume transactions. Custom integrations handle edge cases better and scale more reliably. They also give you full control over error handling and retry logic. For businesses with moderate complexity, a low-code approach is a practical starting point. Our Power Platform integration team in Toronto helps you choose the right approach for your scale.
What Are the Main Benefits of Connecting Shopify to Dynamics 365?
Connecting Shopify to Dynamics 365 delivers measurable benefits across your entire business. First, it eliminates manual data entry and the errors that come with it. Second, it speeds up order fulfillment by triggering warehouse processes automatically. Third, it gives finance teams accurate revenue data without waiting for manual exports. Fourth, inventory accuracy improves because stock levels update in real time after every sale. Fifth, customer service teams see full order history inside Dynamics 365 without switching to Shopify. Additionally, management reporting becomes more accurate when all data lives in one system. These improvements compound over time as order volume grows. Businesses that invest in integration early avoid expensive data cleanup projects later.
How Do You Manage Customer Data Across Shopify and Dynamics 365?
Managing customer data across both platforms requires a clear deduplication strategy. Decide which system is the master record for customer information. Most businesses treat Dynamics 365 as the master and Shopify as the storefront. When a new customer buys on Shopify, the integration creates a contact in Dynamics 365. Updates to email or address in either system sync back to the other. Use unique identifiers such as email address to match records during sync. Avoid creating duplicate contacts by checking for existing records before inserting. Furthermore, respect data privacy regulations when syncing personal information. Shopify Dynamics 365 Integration must comply with GDPR or PIPEDA depending on your market. Our CRM specialists in Toronto design compliant data flows from the start.
How Does AlphaVima Implement Shopify Dynamics 365 Integration?
AlphaVima implements Shopify Dynamics 365 Integration through a structured delivery process. We begin with a discovery workshop to map your current data flows and pain points. Then we design the integration architecture, including sync direction, frequency, and error handling. Our developers build the integration using Power Automate or a custom API layer depending on your needs. We configure field mappings for orders, customers, inventory, and payments. Every integration goes through unit testing and end-to-end testing before go-live. We monitor the first two weeks of production carefully to catch any edge cases. Read the official Microsoft guide on Shopify and Dynamics 365 integration for platform-level capabilities. AlphaVima adds business logic, error recovery, and ongoing support on top of the platform foundation.
What Are Common Challenges With Shopify Dynamics 365 Integration?
Several challenges arise when businesses integrate Shopify with Dynamics 365 for the first time. The most common issue is data mapping errors caused by mismatched field types between the two systems. Tax code differences between Shopify and Dynamics 365 cause financial reporting discrepancies. Order status mismatches create confusion when fulfillment updates don't sync correctly. High order volumes can overwhelm integrations that use synchronous API calls instead of queued processing. Currency conversion errors occur when stores serve multiple international markets. Error handling is often overlooked during initial setup, which leads to silent data loss. Robust integrations include retry logic, dead-letter queues, and alerting for failed records. Investing time in error handling at the start prevents costly troubleshooting later.