


When multiple users access the same Power BI report, they should not all see the same data. A sales manager in the UK should see only UK figures. An account manager should see only their own customers. A regional director should see only their region. Power BI Row-Level Security (RLS) makes all of this possible – without building separate reports for each audience.
In this guide, you will learn the difference between static and dynamic RLS, how to configure roles in Power BI Desktop, how to publish and assign users in the Power BI Service, and how to test your security rules before going live. RLS is a core governance pattern in Alphavima’s Microsoft Fabric services for enterprise customers.
What Is Row-Level Security in Power BI?
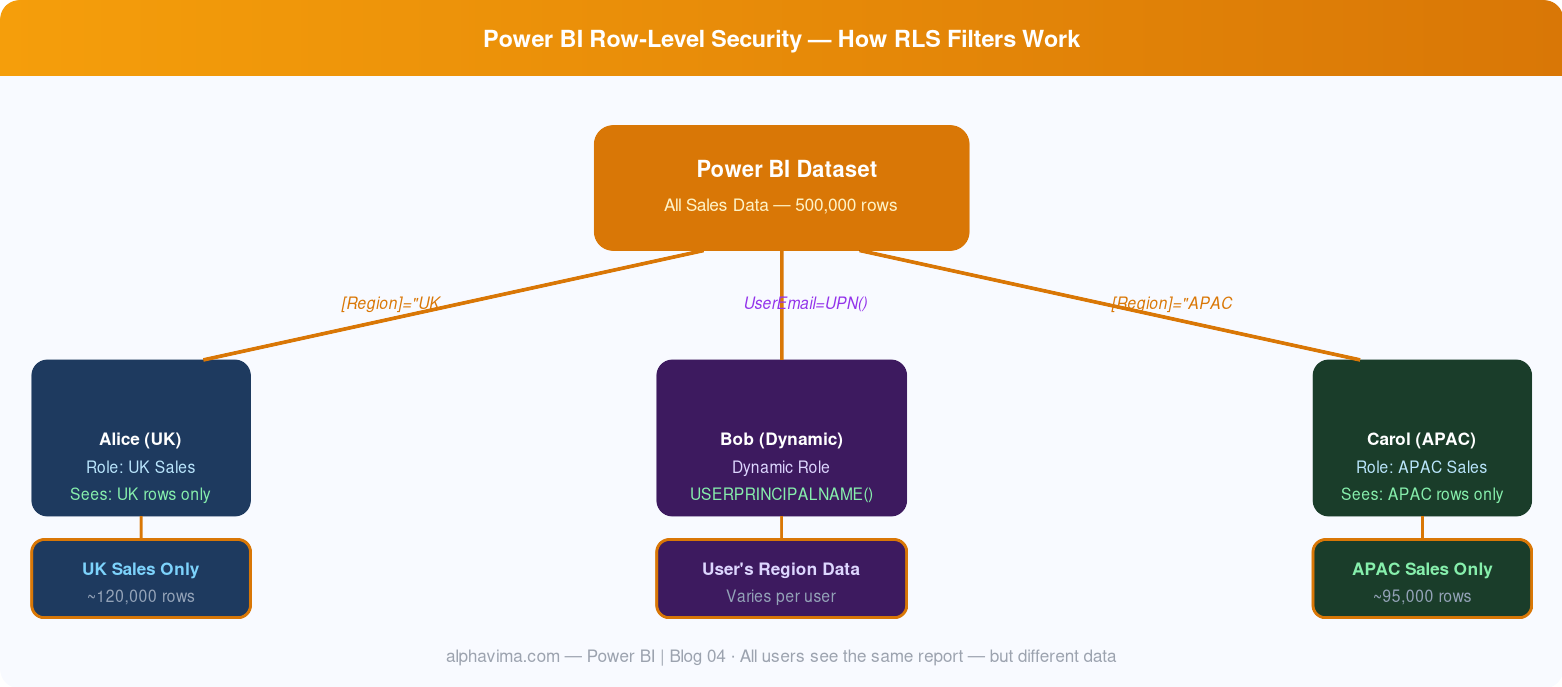
Row-Level Security restricts which rows of data a user can see when they open a report. Unlike report-level permissions (which control who can open the report at all), RLS works at the data level – the same report shows different data to different people depending on their identity.
RLS is defined using DAX filter expressions applied to table roles. These roles are then assigned to users or security groups in the Power BI Service.
There are two types of RLS:
- Static RLS – Hard-coded roles (e.g., “UK Sales Role” always filters Country = “UK”). Good for a fixed number of clearly defined groups.
- Dynamic RLS – Role uses the logged-in user’s identity (via
USERPRINCIPALNAME()) to look up their data access from a table. Scales to hundreds of users automatically.
For organisations that export Power BI data downstream, RLS is essential before connecting to SQL Server or other systems – see our guide on exporting Power BI data to SQL Server.
Prerequisites
- Power BI Desktop (latest version recommended)
- A Power BI Pro, Premium Per User, or Premium licence
- Report data with at least one column suitable for filtering (e.g., Region, SalesRep Email, Country)
- For dynamic RLS: a mapping table linking user emails to their allowed data
How RLS Works
When a user opens a Power BI report:
- Power BI checks which RLS role (if any) the user is assigned to
- The role’s DAX filter is applied as a table-level filter
- The entire report renders using only the filtered dataset – visuals, KPIs, and drill-downs all respect the restriction
- Users cannot bypass or see outside their assigned data, even via export
Part 1: Static RLS Setup
Step 1: Open Your Report in Power BI Desktop
- Open your
.pbixfile in Power BI Desktop. - Ensure your data model has at least one table with the column you want to filter on (e.g., a
Salestable with aRegioncolumn).
Step 2: Create Roles
- Go to Modelling tab → Manage roles.
- Click Create.
- Name the first role:
UK Sales - In the Tables section, select your
Salestable. - In the Table filter DAX expression field, enter:
[Region] = "UK" - Click the checkmark to confirm.
- Create additional roles:
US Sales→[Region] = "US",APAC Sales→[Region] = "APAC" - Click Save.
Tip: You can apply filters to multiple tables in the same role. If you have both a
Salestable and aTargetstable with aRegioncolumn, apply the filter to both.
Step 3: Test Roles in Desktop
- Go to Modelling tab → View as.
- Check the UK Sales role and click OK.
- Your report renders as a UK Sales user – only UK data appears.
- Verify all visuals, slicers, and KPIs reflect the filter correctly.
- Click Stop viewing when done.
Part 2: Dynamic RLS Setup
Dynamic RLS is more powerful and scalable. Instead of one role per region, you have a single role that looks up the user’s data access from a mapping table.
Step 1: Create a User Mapping Table
In your data model, create a table called UserAccess with two columns: UserEmail and Region. Import it from SharePoint, Excel, or a SQL/Dataverse table.
Step 2: Create a Relationship
- In the Model view, create a relationship between
UserAccess[Region]andSales[Region]. - Set cardinality to Many-to-One and cross-filter direction to Single.
Step 3: Create the Dynamic Role
- Go to Modelling → Manage roles → Create.
- Name the role:
Dynamic User Role - Select the
UserAccesstable and enter:[UserEmail] = USERPRINCIPALNAME() - Save the role.
USERPRINCIPALNAME() returns the email of the currently logged-in user, matched against the UserAccess table to filter the Sales table through the relationship.
Step 4: Test Dynamic RLS
- Go to Modelling → View as → Other user.
- Enter
bob@company.comand click OK – only US data should appear. - Repeat for other users to confirm correct filtering.
Part 3: Publish and Assign Roles in Power BI Service
Step 1: Publish to Power BI Service
- In Power BI Desktop, click File → Publish → Publish to Power BI.
- Select your target workspace and click Select.
Step 2: Assign Users to Roles
- In the Power BI Service, open your workspace and find the Dataset.
- Click the ⋮ (More options) menu → Security.
- For Static RLS: Select the role and add team member emails.
- For Dynamic RLS: Add all users to the
Dynamic User Role– DAX handles their filtering automatically. - Click Save.
Important: Users must have at least Viewer access to the workspace. RLS does not grant workspace access – it only filters data within the report.
For organisations using SQL Server as their data source, check our guide on connecting Dynamics 365 CRM to SQL for upstream data governance. See also: Microsoft’s guide to managing security on your model.
Step 3: Test in Power BI Service
- In the Security pane, click Test as role next to any role.
- Confirm the data aligns with expectations before sharing the report link.
Common Issues and Fixes
| Issue | Cause | Fix |
|---|---|---|
| All data still visible after RLS | User has Workspace Admin/Member role — these override RLS | Remove elevated role; use Viewer instead |
USERPRINCIPALNAME() returns wrong value | Guest/B2B scenario | Use USERNAME() or map the guest email |
| Report blank after RLS applied | No matching row in mapping table | Add user to UserAccess table |
| Relationships not filtering | Incorrect cross-filter direction | Set to Bidirectional if needed (use cautiously) |
Best Practices
- Use Dynamic RLS wherever possible – it scales and is easier to maintain than dozens of static roles
- Store your UserAccess mapping table in SharePoint or Dataverse so business owners can maintain it without touching Power BI
- Test with real user accounts before going live, not just the Desktop preview
- Audit role assignments quarterly – leavers and movers often retain incorrect access
- Document your RLS design – include role names, DAX logic, and assigned user groups
- Apply RLS to Dataverse-sourced datasets – if your Power BI model is fed by Azure Synapse Link for Dataverse, layer RLS on top of the Synapse view and pair with Copilot AI in Microsoft Fabric for safe AI-assisted analytics
Conclusion
Row-Level Security is the difference between a report that looks good and a report that is genuinely safe to share across your organisation. Whether you use static roles for a small team or dynamic roles for an enterprise-wide dataset, the setup is straightforward once you understand how DAX filters interact with your data model.
Start with dynamic RLS where possible – the single role approach with USERPRINCIPALNAME() will serve you better as your user base grows.
Need Power BI security configured for your organisation? AlphaVima’s Power BI consultants can design and implement RLS across your entire report estate. Reach out to us today. You may also find these useful: Power BI export to CSV with Power Automate and Power Apps code app tutorial. Need help operationalising RLS at scale? Explore Alphavima’s data engineering services and our Microsoft Fabric consulting locations across major cities. Security is a stack: pair RLS with Power Pages table permissions for portal access and with Dynamics 365 duplicate detection rules to keep your source data clean before it ever reaches a report.